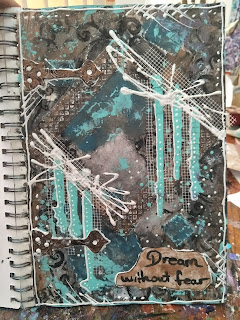
Today's Art Journal Page is called "dream without fear".
I started by using white gesso and scrapped it all over the page using an old bank card. I then collected these very cool stamp style die cuts sent to me from an amazing friend. I also used a delicate, decorative boarder die cut and placed it on top of the other collection of die cuts. I then used gesso over the top of the die's patting off the excess gesso all over the page creating fun texture.
I let the page dry for about ten minutes before scrapping black gesso over the page, picking up some wet white gesso as i scrapped. By doing this lightly i made various shades of grey.....Not quite fifty shades.... Sorry i had to make that joke... Once i had dried the page with the hair dryer i placed a fantastic stencil on the page. I used a baby wipe lightly dipped onto the lid of the black gesso and gently rubbed it over the stencil. I didn't dry between stencilling i just lifted it up, moved it and continued rubbing. This helped give a light overlapping effect with the stencil.
Once dry i used Tim Holtz Distress Paint ( mermaid lagoon - antiqued bronze), however you can use any acrylic paint you have. I used a stiff dry brush to rub the paint onto the page. I used the blue on the stamp squares and the bronzed paint on the largest die cut as well as around around the page. Giving it an almost vintage look.
I then used this fantastic mint acrylic paint. It's very runny so i leaned the page against my paint brush holder and ran the paint down the page in three lines. Allowing gravity to take the paint as far as it wanted to go. I then used the tip of my paint brush to add dots following the drips down the page.
When the paint was almost dry but still tacky i used a baby wipe and lightly pressed it onto the page collection just a little bit of mint paint onto it. I then dabbed and rubbed the baby wipe onto the page smearing the paint onto the page. I mainly kept the bulk of the colour toward the bottom of the page but as you can see i rubbed little bits where i thought necessary.
You might have noticed in the above picture i added white lines and dots to the mint paint run. I dried the page before adding this. I used a white 3D fabric paint i buy from spotlight. Some local cheap stores have 3D fabric paint in their craft sections. They all vary in thickness and quality. Personally i use 3D paint in small squeeze tubes as they are easier to use. I have also found that for white, gold, black and silver spotlight quality is second to non.
I then cut up strips of plasters tape. It's a white mesh tape you can buy from bunnings. I found half a roll of it and i can tell you it's so versatile. It can be painted, used as a stencil for small squares as well as used on cards and atc's. I placed this tape along The edge of the decorative die cut covering the start of the mint paint on the angle. I also ran the tape in between the paint drip. I then used the fabric paint making rough lines on the angle of the tape. I also gave the page a boarder added random dots around the edge of the page and anywhere else i thought looked good. I also used two amazing die cuts of vintage latches made with cardboard. I placed them on one side of the page to look like a cover of an old fashioned book. Then i used a quote and rubbed the page with the bronze paint. Honestly i'm not happy with the way the quote looks. I will go over this in the future but it will do for now..
I really hope you have enjoyed this page. Give it a go and share your page.
Thank you for taking time out to look at my blog. Much love. xoxo


I really enjoyed reading how this journal cover was created. I am so new to mixed media that I love to see how each piece is made. Love the colour scheme you used. The plasters tape is great isn't it. Funny where we buy craft supplies! Stunning creation Rebecca-Lee. So glad you shared it with us.
ReplyDelete